Now that many of us are slowly transitioning to a USD based workflow, it will be more important to understand how to do certain things in Solaris, the USD based scene management and layout context in Houdini. One of the more hidden things is, adding metadata to your renders. What I am showing you is not limited to Houdini’s own renderer Karma but should work with all Hydra Delegates that work in Solaris.
I have also released a HDA that makes it easy to add metadata to your renders. You can find it here.
First things first, I will keep this as render engine agnostic as possible. This means that I will not use the Karma Render Settings or Karma LOP. Those are digital assets that include the Render Product LOP that we will need to modify. This means that if you add a Karma LOP instead of the USD Render ROP at the end of your node tree, the Render Product LOP inside of the Karma HDA will overwrite the Render Product LOP we will need to create ourselves.


Of course, nothing will stop you from jumping into the Karma HDA and modify the Render Product LOP there but again, I will write this in a way that should get this working with all render engines.
Page Contents
Add a custom Parameter
On our Render Product, we will need to add a custom Parameter. This is almost the same as adding render properties or custom data to renders in Mantra, we just need to use different commands. (Which I didn’t learn by myself but through this great answer from a Houdini Dev on the SideFX Forum here.)

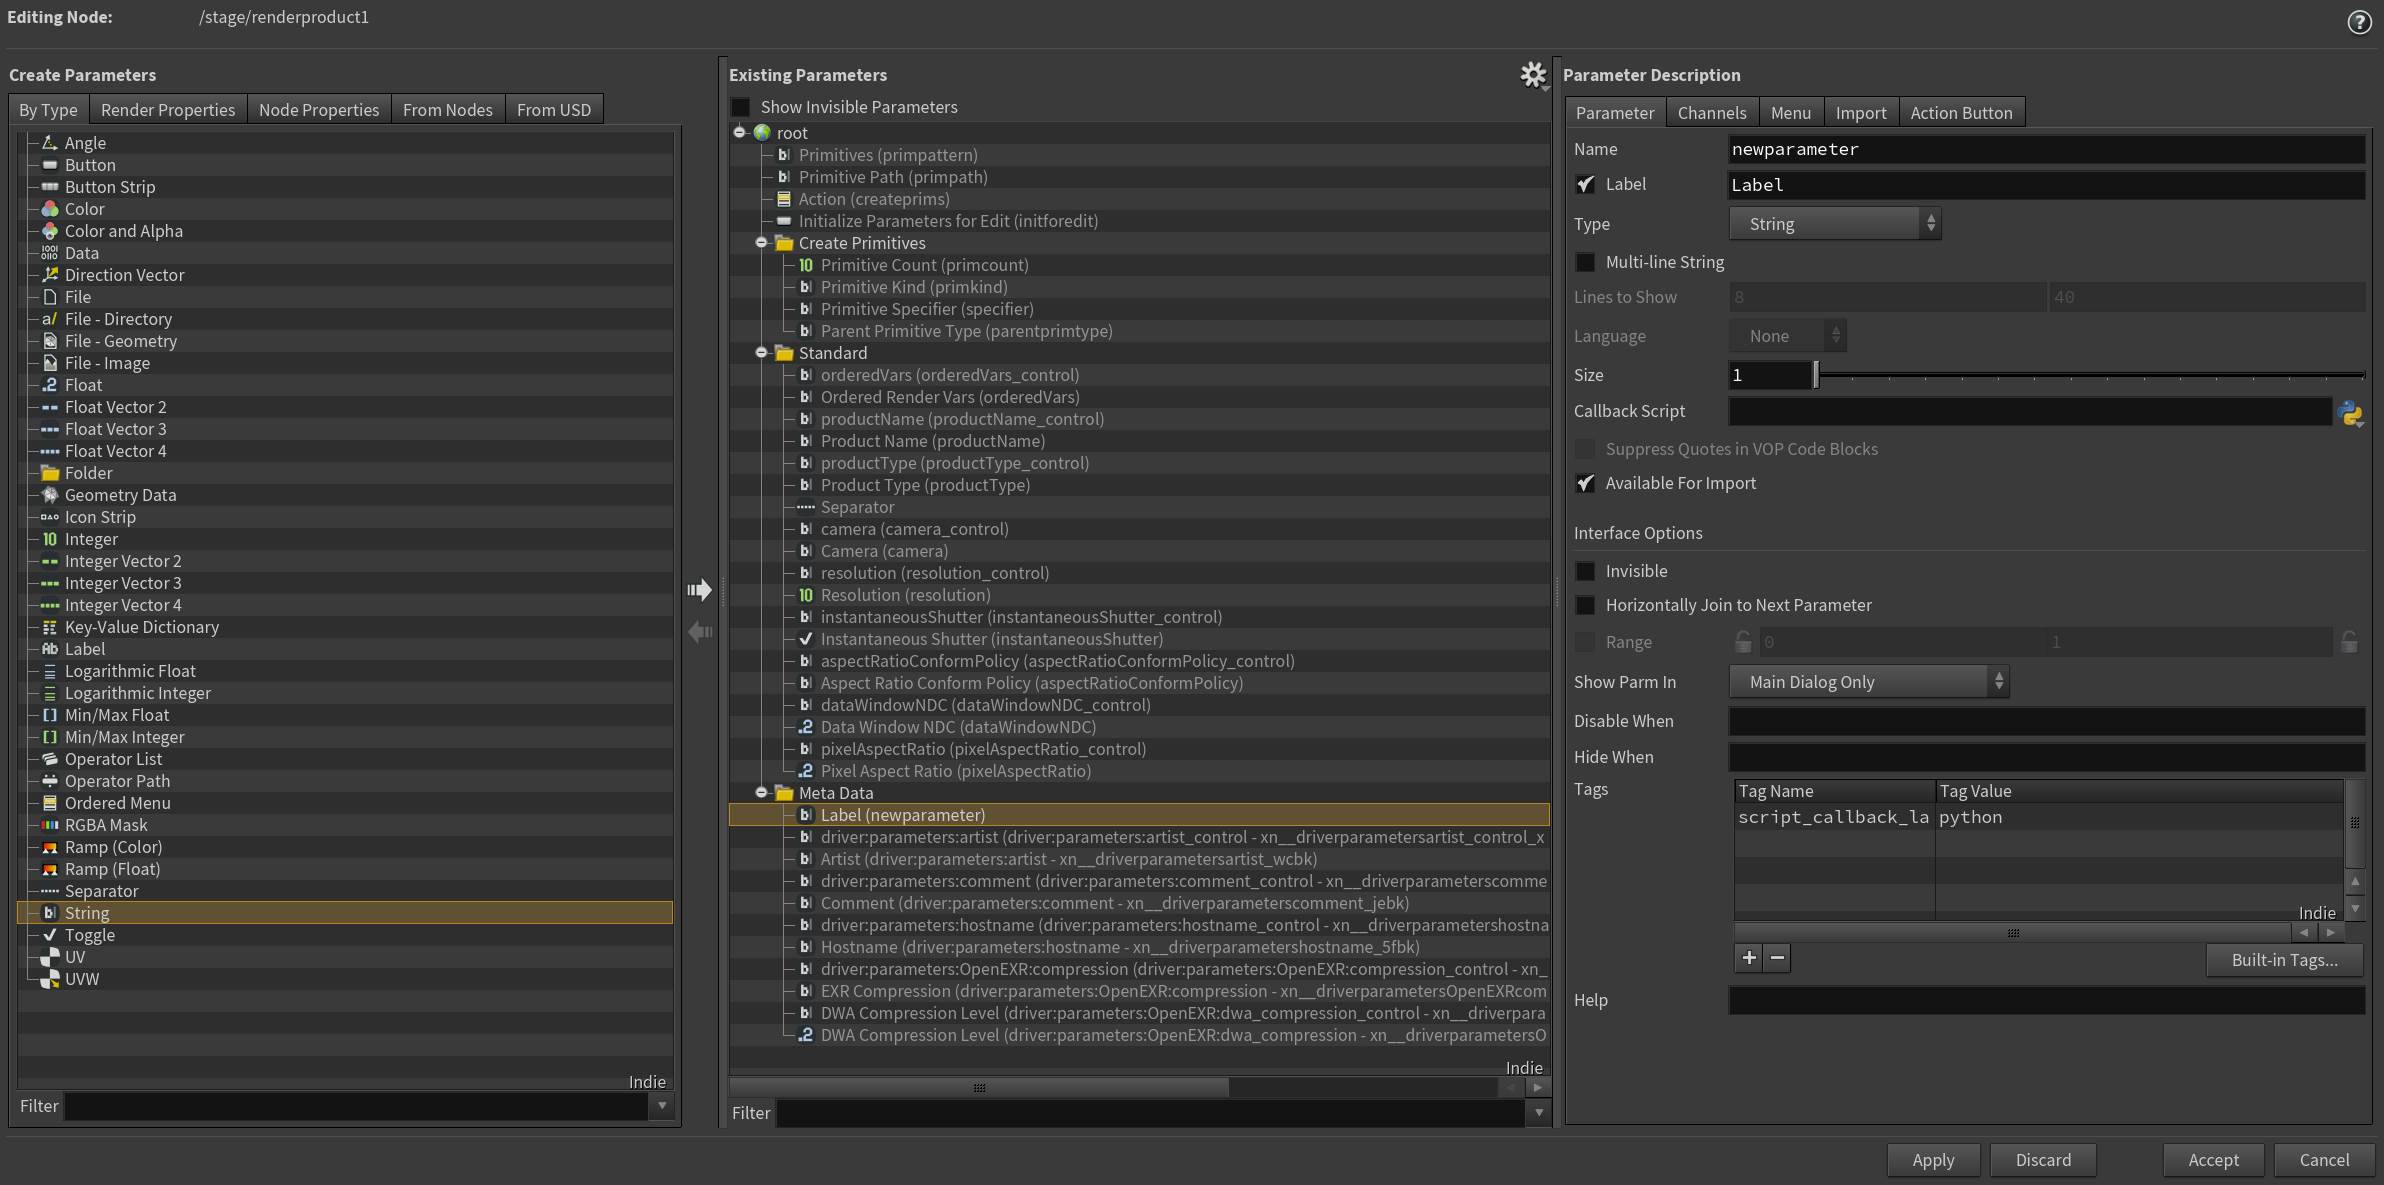
Select your Render Product and click the Settings icon on the Parameters Pane. Click Edit Parameter Interface.
A new window pops up where you can add and edit custom Parameters and your nodes. We will need to create a new String Parameter on this Render Product.
To do this we will take a new String from the right pane and drag and drop it into the middle pane. To keep order I would advise putting the new String Parameter into the Meta Data Subfolder.

But how do we know what to put into this so that Husk/our renderer will understand this? The easiest way is to look at other Parameters that add Metadata. For example, here I am looking at the Parameter that adds the Artists name to your Metadata.
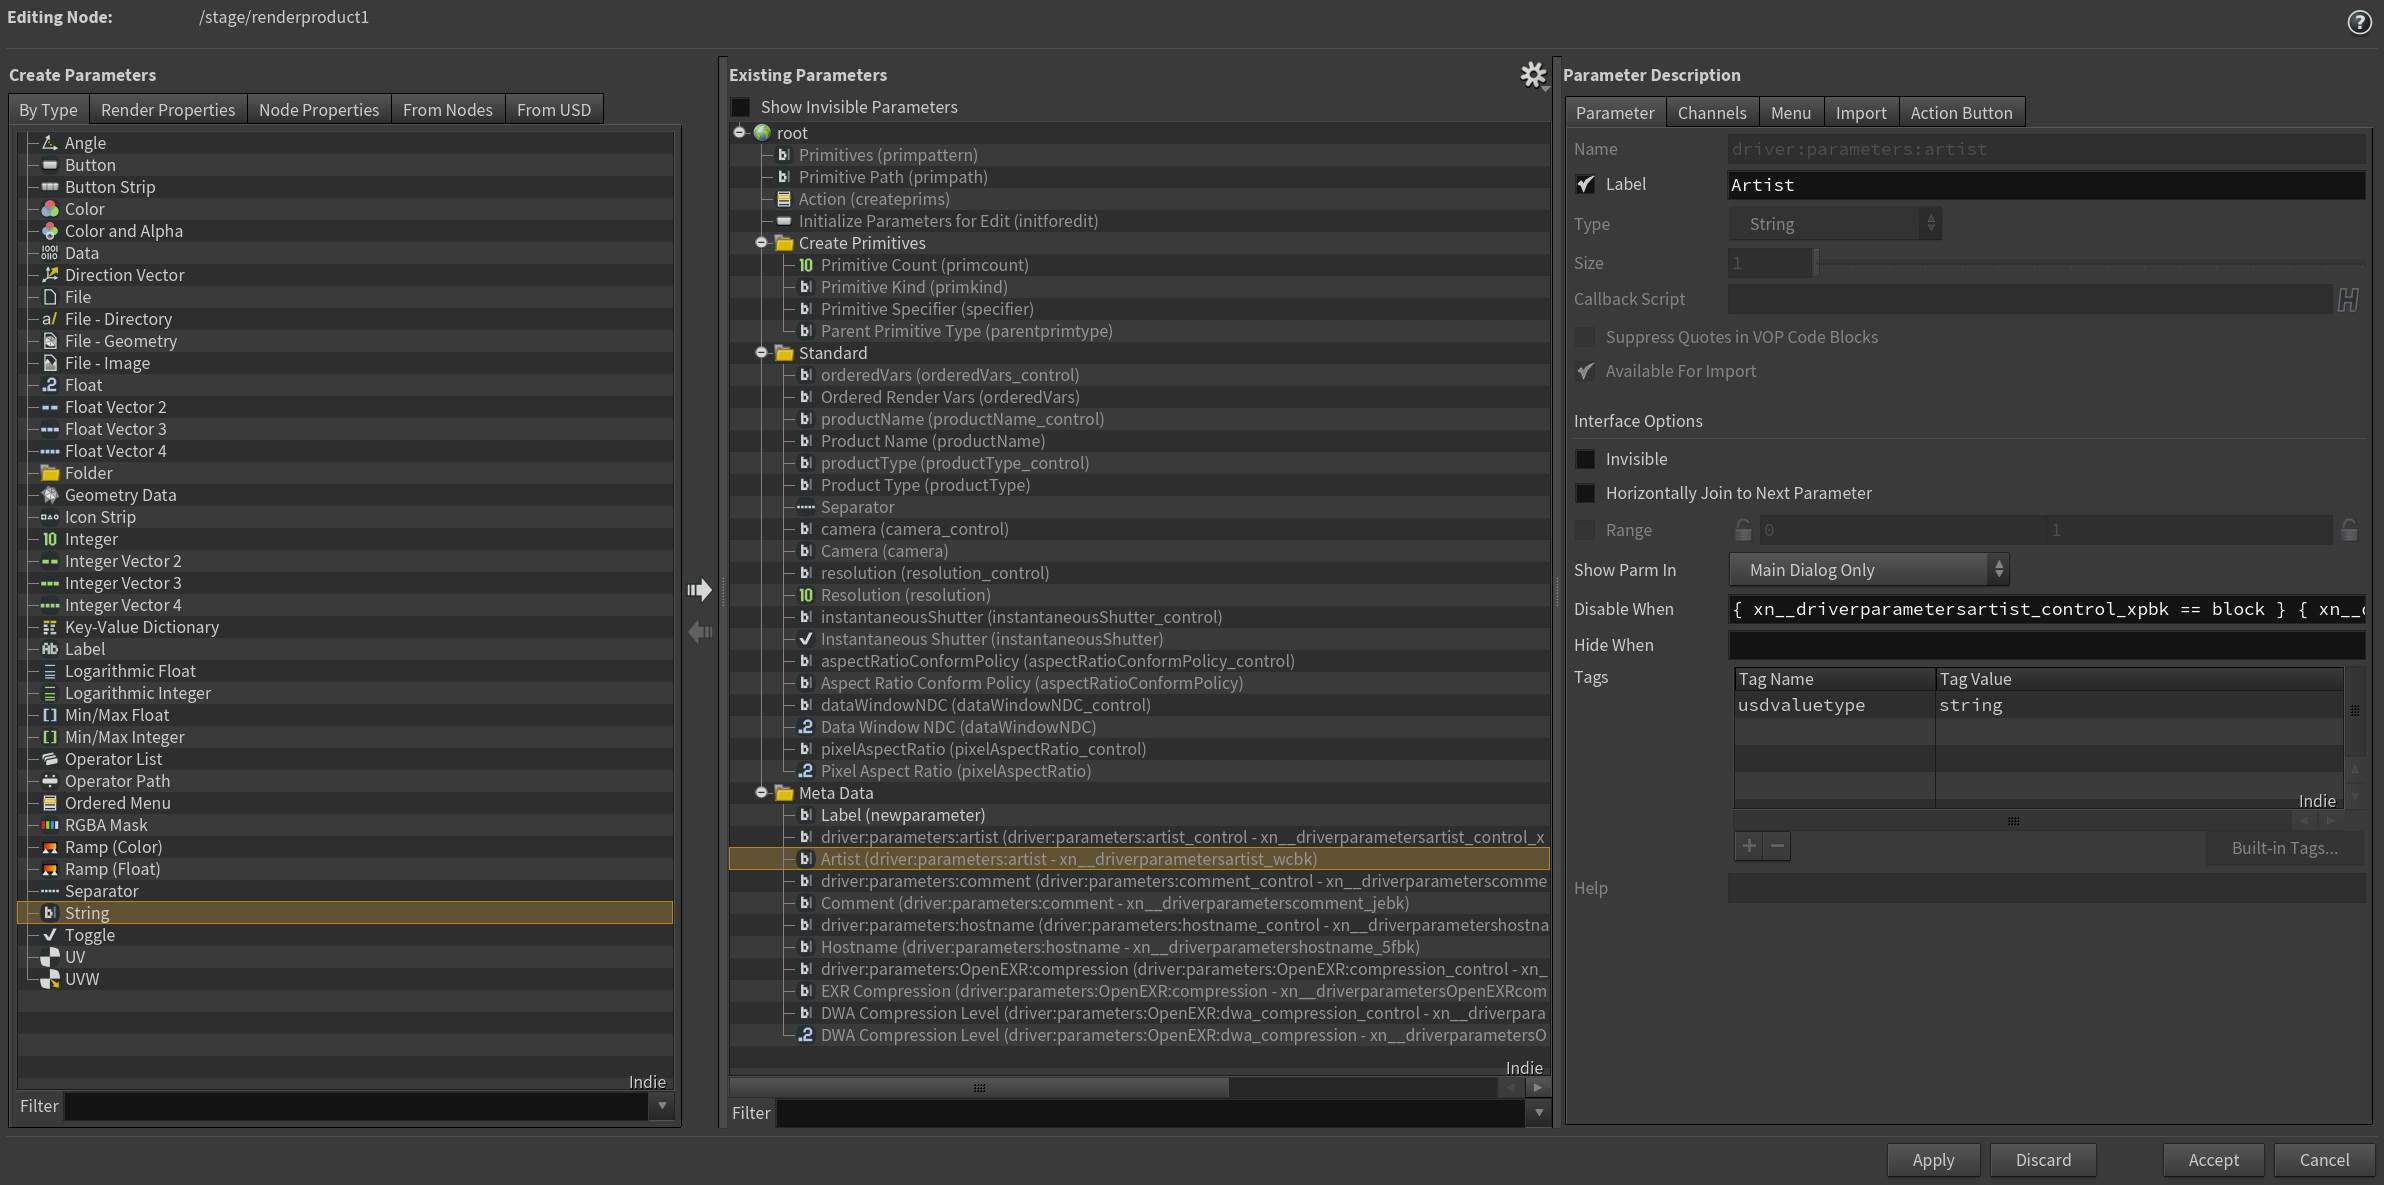
As you can see there isn’t so much going on here. The most important bit is the Name. This is the internal name inside of Houdini. This HAS to be unique per node and is used, for example, when referencing channels or Parameters. This is also what Husk will look at when deciding what to put into your MetaData.
So for the name type in driver:parameters:OpenEXR:CustomMetaData
You can name the “CustomMetaData” whatever you want. It’s simply important to have the first part correct.
You can give your Parameter a custom Label if you want. This is what you will see as a name next to the Parameter and doesn’t have to be unique. This is really just for visual cleanliness.
The next thing that is different is the Disable When field. But we can ignore this. It is only used to disable the Artist Parameter when the Set or Create Drop-Down menu is set to disable this Parameter. We could create this for our custom Parameter as well but it isn’t necessary so we can keep this empty.
But if we were to hit Apply this wouldn’t work yet and this is because we are missing the right Tag. So on our own custom metadata Parameter delete the existing tag (which should be script_callback_language) and add a new one. With the Tag name being usdvaluetype and the Tag value being string
Houdini 19.5 Update
Thanks to a nice commenter I was notified that this workflow isn’t working in newer versions of Houdini anymore. This is because we now need the control for set/block/Do nothing. The easiest way of getting this is, by duplicating an existing one.

Click on any of the existing control drivers, like driver:parameters:comment_control. They always have _control in their name.
Place the control above your existing custom metadata control. In my case, I named it driver:parameters:OpenEXR:CustomMetaData_control but it doesn’t actually matter. It always controls the parameter next to it (Check the Menu Tab to see where that setting is but keep it like it is).

Bonus points for Enabling/Disabling the Control
The following isn’t necessary, but if you want complete parity between the original controls and your custom ones then we should add the appropriate code to the Disable When parameter.
Again, just copy it from an existing control and paste it into the Disable When on our Custom MetaData text field (not the control above it).

You can find out how the control can be referenced by scrolling to the right in the Existing Parameters Pane. It needs to be exactly like it’s displayed including the cryptic xn_ and the random characters after. Change the name for both functions inside the same Disable When.
Now your control will also grey out when not enabled. But again, this is just to make it pretty, not strictly necessary. At this point, I would also say, that creating a reusable VEX setup for this is faster. You can take a look at my Karmara HDA to find out how.
Add the Metadata
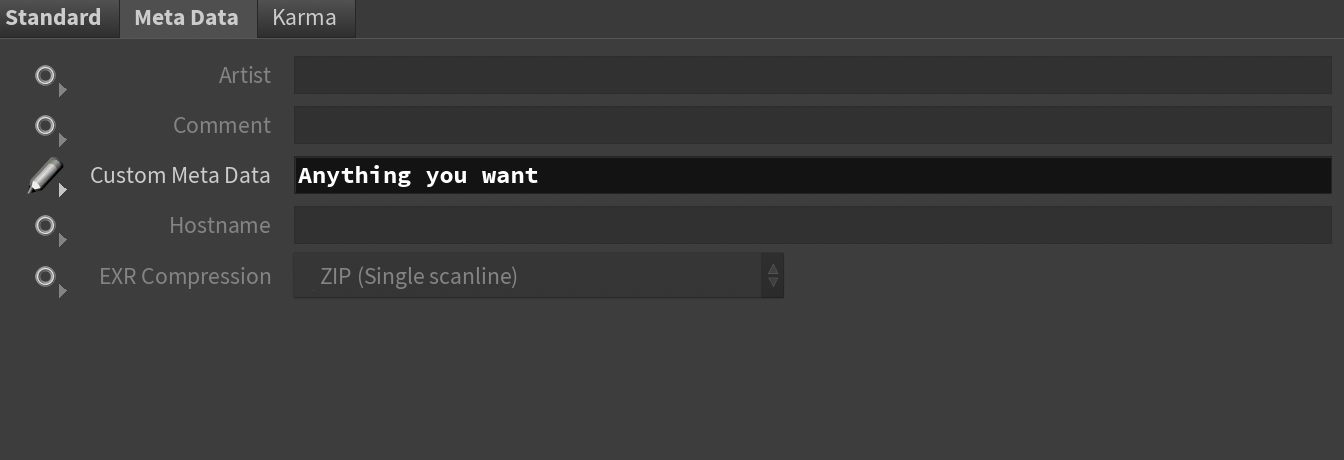
Now hit Accept and click on the Render Product. Change the Set/Block/Do Nothing control to Set or Create. Type in anything you want.
Now, in your Scene Graph (lower-left corner in the Solaris Desktop). Click on the RenderProduct and see what you will find in the Scene Graph Details next to it.

If we were to render this to disk you would find a MetaData called “CustomMetaData” with the string “Anything you want” in it.
Now you might ask, but why is this useful? Well, besides adding secret messages to your 3D renders for your fellow coworkers to decipher, we can literally add any data we want, including the values of channels.


