Page Contents
Page 3
You can download the basic Examples (for free) or support me and buy the Advanced Examples I used to create the videos:
DownloadpCustomForce – Optical flow motion from video to drive particles
It’s always a cool effect to have particles move with the motion of a video. And assembling this in Fusion is very easy. This is one of these really simple but very impressive effects, especially for motion graphics, but there are some cool applications for VFX, too.

First, you will need a suitable video. You can theoretically use any video, but one with a static camera and high contrast look especially good. If your video is shaky, you might want to stabilize it beforehand to get rid of the camera motion (or any other motion you don’t want OpticalFlow to pick up).
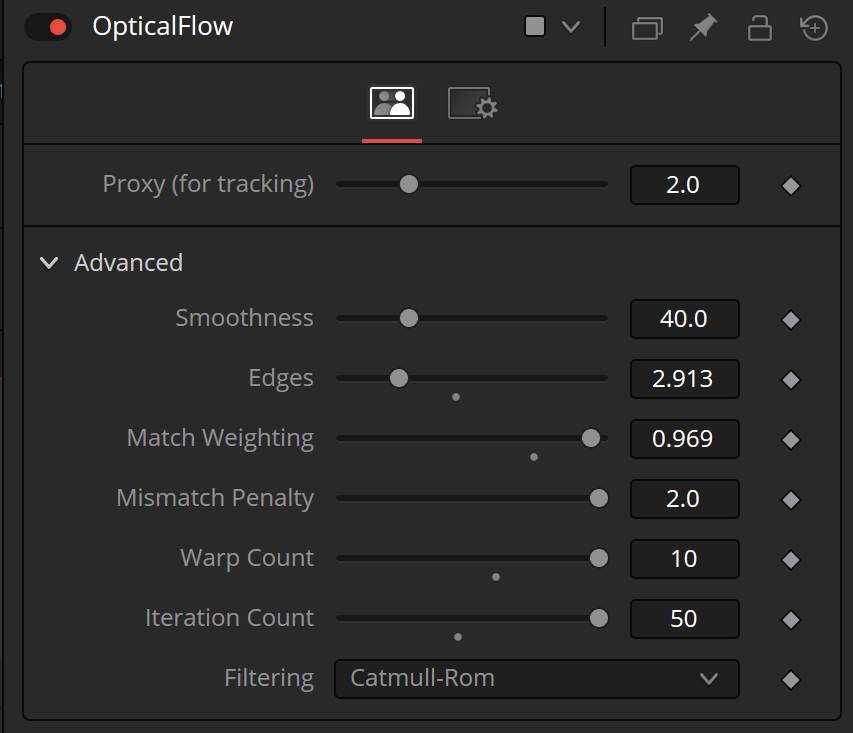
After your video, drop down an OpticalFlow tool after your video. You can usually get away with very low settings. Most of the examples in the video above are using these settings:
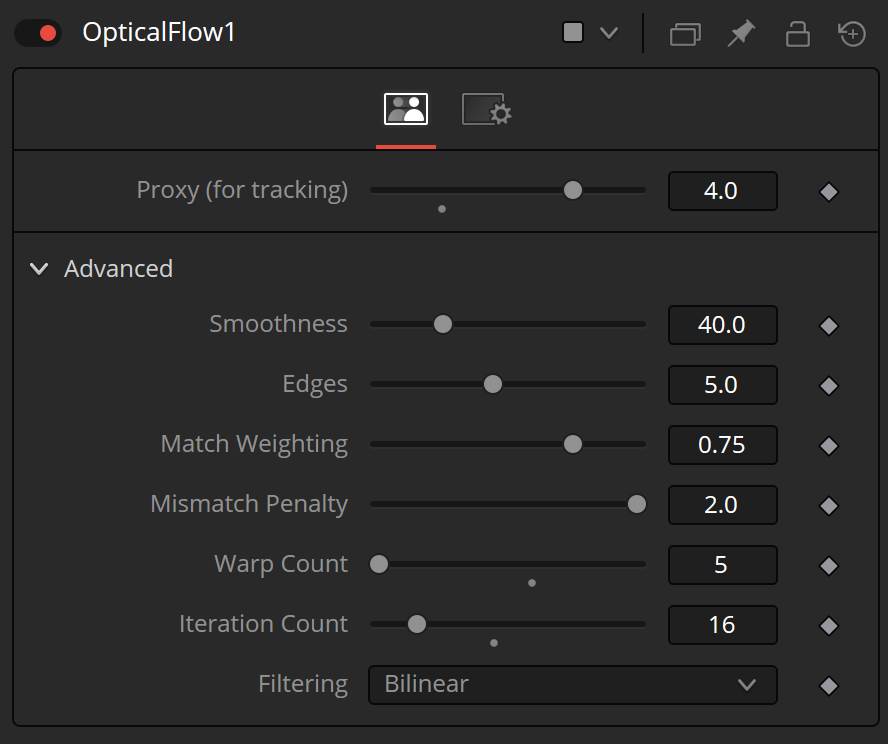
The OpticalFlow tool will analyze your footage and calculate the movement. This is used throughout of Fusion to motion track footage, create fake slow motion, warp two images, or in our case, influence particle motion. It saves the data to the X and Y Vector Channels.
It’s important to understand that this does not calculate motion in the Z-Direction. This will work on a 2D plane. But you could try faking it of course.
The next step is, to copy the Motion Vectors that are saved in the Vector Channels to the Red and Green Channels. We do that by using a ChannelBooleans tool. I connected a Background tool to the Background Input of the ChannelBooleans and the OpticalFlow tool to the Foreground Input.
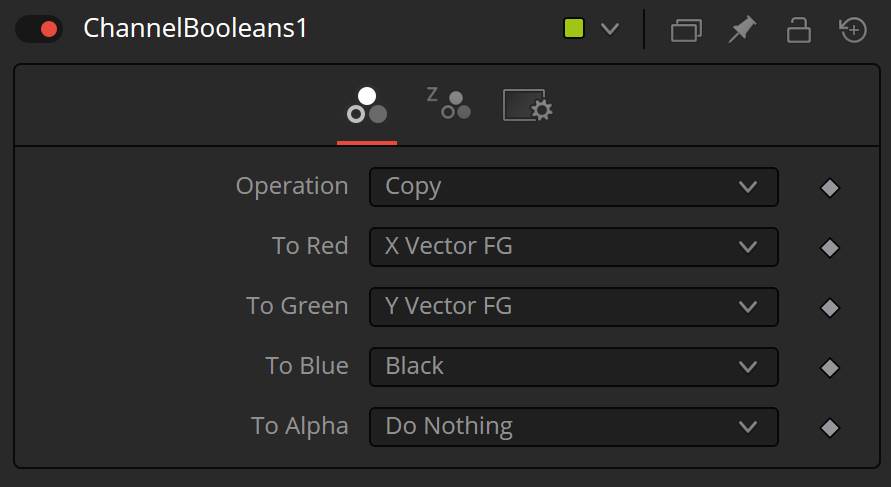
The ChannelBooleans Operation needs to be set to Copy. And we will put the X Vector FG to the Red Channel and the Y Vector FG to the Green channel. Blue needs to be empty, meaning black.
Now you will see something like this in your Viewer. Don’t worry this hellish looking image is correct.

You probably want to add a SmoothMotion tool between the OpticalFlow and ChannelBooleans tool, set to smooth the Vector Channel. This will get rid of small anomalies and artifacts that you might not want to see in your particles. You can chain several together for stronger smoothing.
No it’s time for the particles. The usual use case would be to add a pImageEmitter with your source video in the Image Input. But of course, You can add any other image you want, if you only want the video’s motion but not the colors.
In most of the examples in the video, I have used a key to get rid of black (or uninteresting) pixels and set the Alpha Threshold in the pImageEmitter higher. This means it will only spawn particles in bright areas where the Alpha Channel isn’t zero.


In the image above I’ve taken extra care key out everything except the wacky inflatable arm flailing tube man.
Next, we will need a pCustomForce tool. You can also try the pCustom tool but that will copy the velocity to the particles instead of gradually pulling them towards the force. Which can be a nice effect, too. But usually, you will need to have several SmoothMotion tools chained together for it to not look like a buggy particle mess.
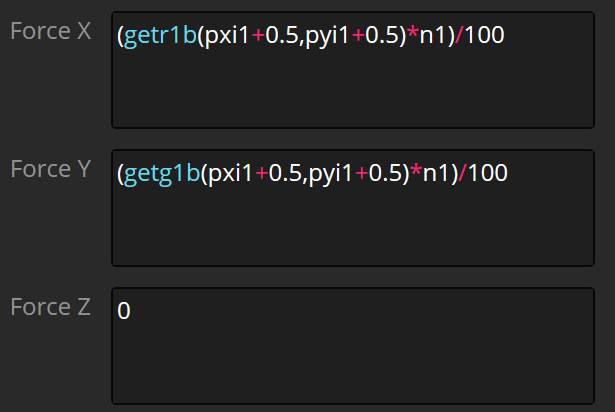
In the pCustomForce head into the Force-Tab:
Force X: (getr1b(pxi1+0.5,pyi1+0.5)*n1)/100
Force Y: (getg1b(pxi1+0.5,pyi1+0.5)*n1)/100
What is going on here?
As you might have noticed, this is almost the exact same setup as used in the example before. We are only reading the data from the first image input:
(getr1b(pxi1+0.5,pyi1+0.5)*n1)/100
Placing this data into the origin where our image emitter is:
(getr1b(pxi1+0.5,pyi1+0.5)*n1)/100
And multiplying this by the n1 number input, and then divide everything by 100 to have finer control over it.
Now set a (small) value in the n1 number input and your particles will use the motion from your video.
It’s great to experiment with different settings in the pImageEmitter. For example, you might want to try that the particles keep their color from their first spawn frame, or change the size based on their speed.
Download this Example here by choosing the Advanced Examples package:
DownloadCustom Tool – Only spawn particles on video movement / Mask out by Motion
In this example, we will be using the previous setup but use another custom node the Custom Tool to mask out areas with low movement. This means that particles will only spawn when we have high velocities from the OpticalFlow Motion Vectors.
So technically this is more of a Custom Tool example than pCustom. But it plays nicely with particles so I wanted to include it.
The video above is the same as the previous example. But I have marked which clips use this masking technique.
In another example, I first stabilized the camera (as it wasn’t static enough) and roughly masked out my face using a PlanarTracker. If your footage is shot from a tripod, you probably won’t need to do that. Like I didn’t in the example I am covering right now.
It is important to Mask out the areas you want after the OpticalFlow tool. Otherwise, it will give you wrong Motion Vectors on the edges of the mask.
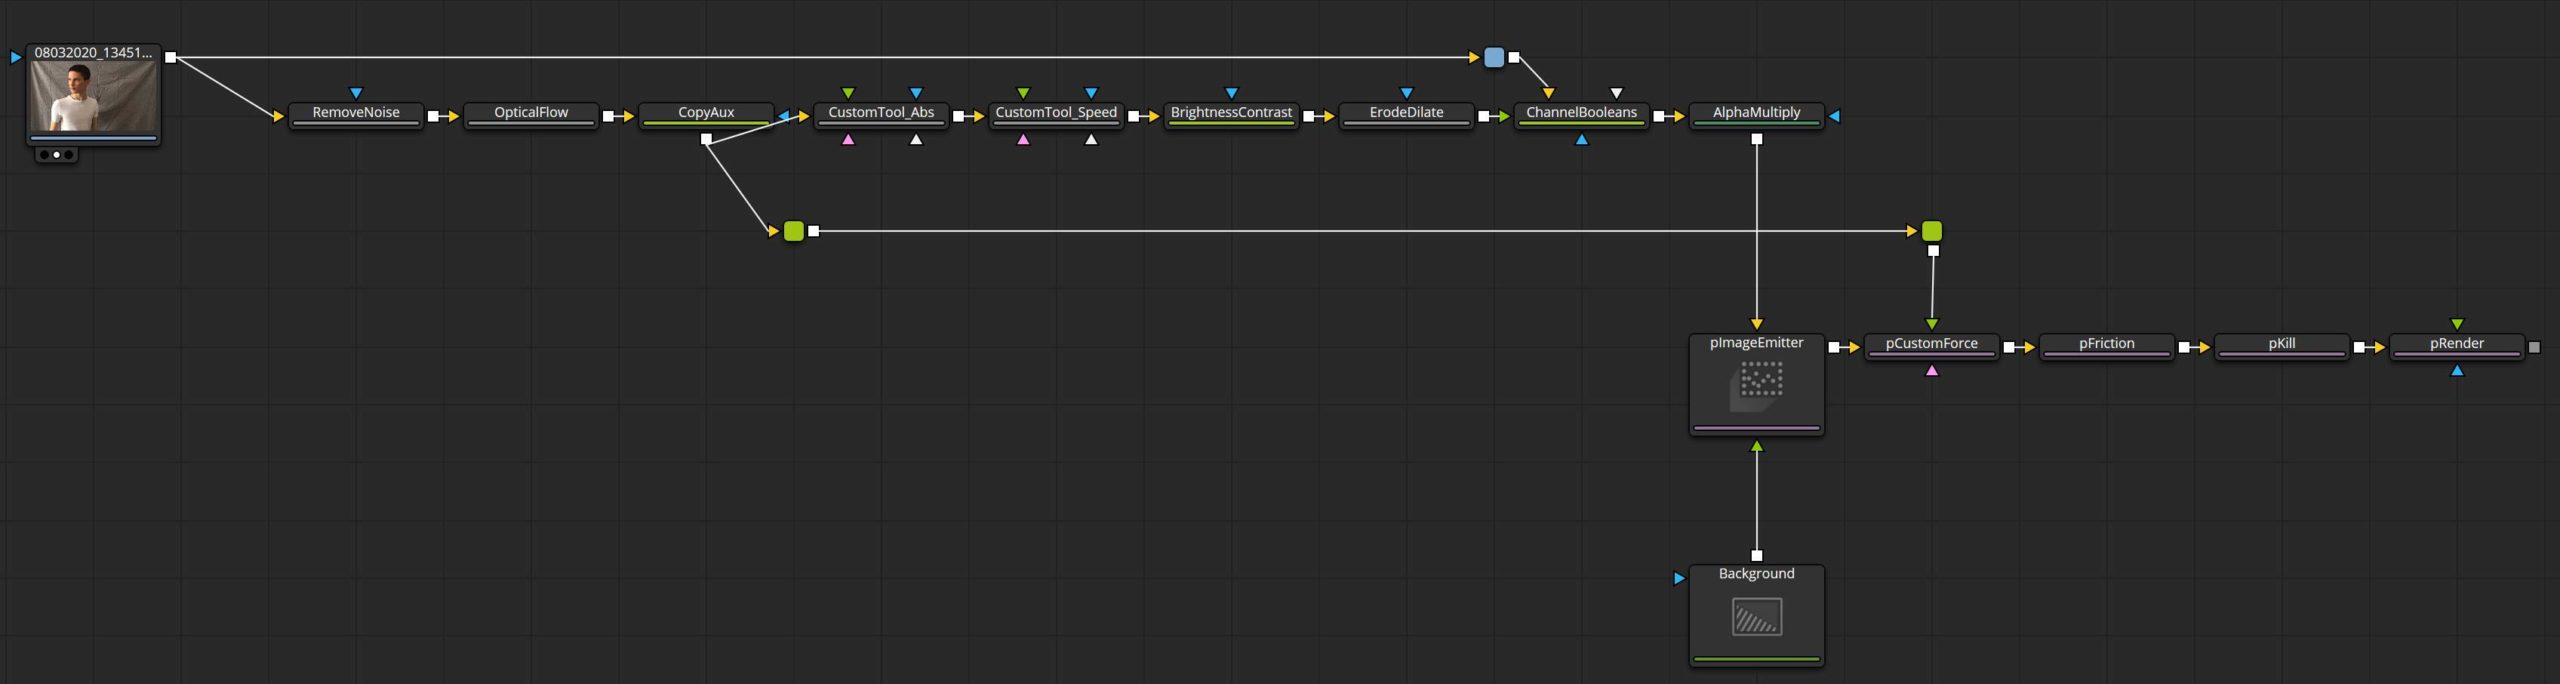
First, we need Motion Vectors, so we place an OpticalFlow tool after our (stabilized) footage. Keep the default settings for now. We can go back to this node once we have the rest of the setup done.
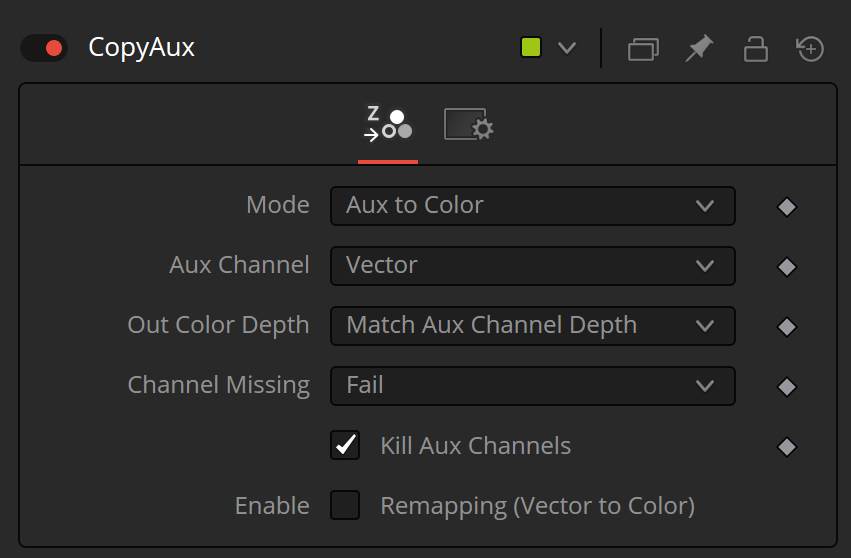
Pipe the Output of the OpticalFlow tool into a CopyAux tool. This will copy the specified auxiliary channel into the R, G, B channels. Just like we did with the ChannelBooleans tool before. Just another way to do it.
Remember that the Vector channel can go very high in both positive and negative values. This is why we will use a Custom Tool to make all values in the color channels positive and working with it easier.

In the Channels-Tab:
Red: abs(r)
Green: abs(g)
Blue: abs(b)
Next we add in another CustomTool.
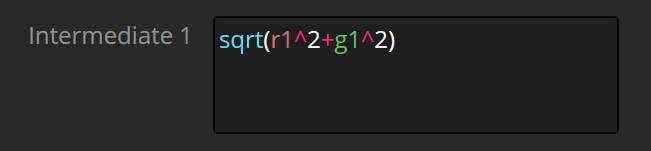
In the Inter-Tab:
sqrt(r1^2+g1^2)
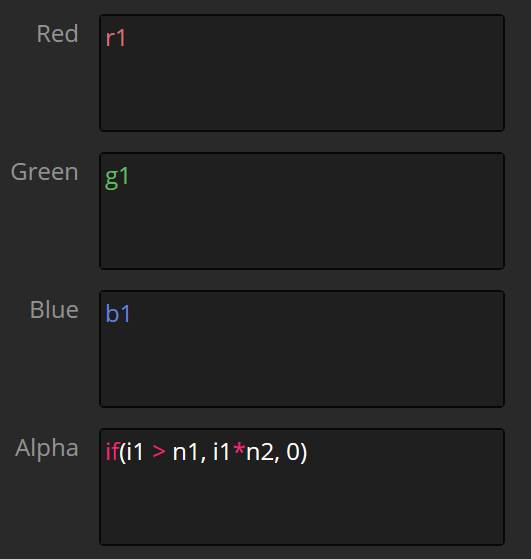
In the Channels-Tab:
Alpha: if(i1 > n1, i1*n2, 0)
(You might have noticed that the speed calculation in the Intermediate 1– field can’t be quite correct when we convert everything to positive values, and that is true. But after some experiments, I found this to be the most successful.)
What is going on here?
We are using the OptialFlow Motion Vectors to calculate the speed of each pixel. This happens in the Intermediate 1 (i1)-field.
Next, in the Channels, we use this data from i1. If the speed is higher than the specified value in n1 then the Alpha value for this pixel will be the speed (i1) multiplied by a value in n2. Everything else will have a Alpha value of zero.
Now, view the Alpha Channel while you are dialing in the n1 and n2 numbers to mask out the high velocity pixels.
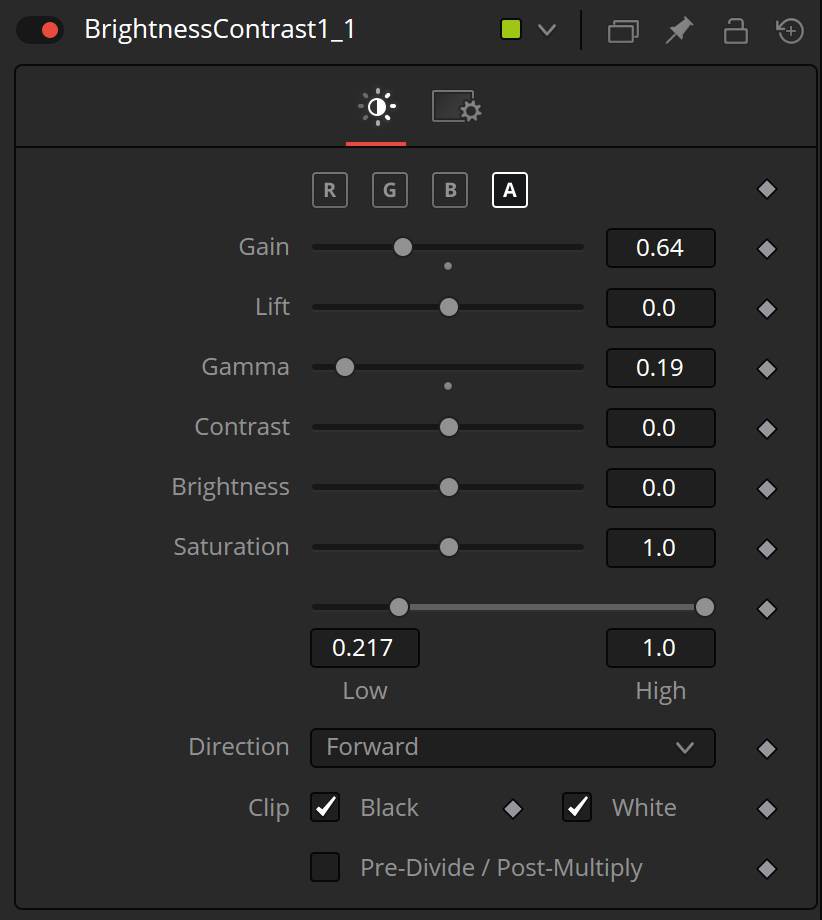
After the CustomTool you want to place down a BrightnessContrast tool to remap the Alpha values into something more usable. Especially getting rid of flickering background values is important.
Note that this should be performed on the Alpha Channel. You can view the Alpha Channel by clicking in the viewer and pressing A.
I have also added a ErodeDilate tool to choke the Alpha a little bit, but this is optional and will depend on your footage.
In the next step, we will use another ChannelBooleans tool to apply the Alpha we have generated to the original footage. After that, you can use an AlphaMultiply tool to multiply the color channels with the Alpha. The pImageEmitter doesn’t need this, but it’s easier to view the image this way.
Now would be a good time to go back to the OpticalFlow tool and tweak the settings so we get a somewhat smooth result. I have chosen these values for this example, but for many effects, it’s good to have smooth edges.
Now, you only need to specify a good Alpha Threshold inside the pImageEmitter. This creates a really cool effect with the previous example. But adding other forces to it can create great effects as well. Experiment with having them static, for a particle-based Trails tool, or making the particles big rectangles for a data mush effect.
Download this Example here by choosing the Advanced Examples package:
DownloadI hope this blog post was helpful and cleared up some confusion about the pCustom tool. Or at least inspired you to try out more. Let me know if you’ve found any other ways to use it (or show me what you’ve made with these techniques).
I know that there is still a ton that I can learn about the different Custom tools in Fusion and will update this post when I find more use cases regarding particles.
Let me know if you have any questions!


