Change Strings has been updated last on 02.12.2022 to version number 2.0.6
Change Strings can batch change or rename most strings, meaning text, in Blackmagicdesign Fusion and Fusion inside DaVinci Resolve. These strings are Tool/Node names, expressions, and filepaths. Simply write the text you want to replace (or delete) into the designated Search for and Replace with Text fields. Make sure you have all the tools selected on which you want the search and replace operation to be performed and press OK.
Common tasks like replacing Loaders Filepaths can be greatly accelerated and increasing versions is as simple as clicking a button.
You can download this script here, or in the Downloads area on the next page. There you will also find a changelog and legacy versions. Change Strings will be available on Reactor in the future.
Change Strings 2 is a major update with changes to the default behavior! Previous users are encouraged to read the changelog or watch the new features overview.
Download on Gumroad:
Download onDownload on itch.io:
Learn here how to install scripts in Fusion or DaVinci Resolve.
This page serves as an in-depth manual of the script as well as the download page.
Make sure to check out the Advanced Searches as they will help you find and replace much quicker. For example, to remove the annoying numbers that Fusions appends to tool names when they are copied.
I created this script for my own personal use and learning scripting for Fusion, but after putting more and more functionality into it, I decided to make it publicly available for free. Feature requests are welcomed as they will help me improve the script and ultimately the Fusion experience for all of us. If you want to support me by donating you can download (and donate) using Gumroad.
You can watch Change Strings 2 in action in this video:
And in this video of Change Strings 1 you can learn about using it:
Or read about changing Names and staying organized here. And a separate blog post about changing filepaths and filenames can be found here.
Page Contents
Page 1 – Manual
Change Strings Main Window

About Button
The About Button will open a new window with some information about the script and some advanced settings. Jump to the About window explanation by clicking here.
Search for and Replace with Text field
( Jump down to removing numbers ↧ )

As the names suggest, these are the text fields where the user (you) can write in the search you want the script to perform. New since version 2: Spaces are now supported by default. When activating the Space Splitter setting you can separate different searches by using a space between words (or patterns). Users of Houdini might be familiar with this type of list separation. This allows switching around patterns thanks to the Pattern Breaker.
Both the Search For and Replace with fields save a history of up to five previous searches.
Click the X Button to clear the field. Shift + Click will recover the previous input.
Advanced Searches
Change Strings was written in Lua, this means that we have access to additional search shortcuts that are built into the programming language. These are the ones that are supported:
%a | all letters |
%d | all digits (Very useful for removing the digits Fusion creates by copying nodes, a mini-tutorial is right below) |
%l | all lower case letters |
%u | all upper case letters (this will force the search to be case sensitive) |
%p | punctuation characters (Like “, . ; : _”) |
%s | space characters |
These shortcodes also work the other way around. For example, “%S” (uppercase letter) would search for all characters that are NOT spaces. And “%D” would search for all characters that are NOT digits.
If you are familiar with Lua you might know about the shortcode “.”. This would usually force Lua to replace all characters. This was disabled and instead changed to search and replace for dots “.” instead. I believe this is the wanted behavior in most cases.
If Change Strings detects shortcode-like characters in the text you want to replace in, it will disable shortcodes in the search.
The most useful is definitely “%d” as shown in the mini tutorial below:
Removing the numbers from copied nodes
( Jump down to Replace in Settings ↧ )
Everyone using Fusion knows that when you copy a node, Fusion will append a number to the name. This is important so that each node has a unique name, but it can be annoying to remove them, especially if you start to copy copies. Let’s look at the following (horrific) example. I use the Advanced Searches to remove the digits. These are our nodes:
We simply search for “%d” and will replace it with nothing which will give use this:
Much better!
Switch Button

This button will switch the Inputs from the Search for or Replace with fields.
Replace in Settings
Texts:
Names
Checking this will make Change Strings search and (if it finds) replace the patterns in all the names of the currently selected nodes. This includes pipe routers but excludes Modifier names, as those are “not selected” when you are selecting a node. To include Modifiers enable the Include Modifiers Setting.
Remember that Fusion does not support spaces in tool/node names. They are not changed to “_” either. Many other characters like “#, *, ~” are not supported in tool names as well.
Expressions
Checking this will make Change Strings search and (if it finds) replace the patterns in all the Expressions of the currently selected nodes. This excludes Modifier Expressions or the Expression Modifier, as those are “not selected” when you are selecting a node. To include Modifiers enable the Include Modifiers Setting.
Styled Text
Checking this will make Change Strings search and (if it finds) replace the patterns in all the Styled Text Textboxes of the currently selected nodes. Notable examples are the Text+ and Text3D Tools. But theoretically, fuses and macros that use the same naming convention as the Text+ Tools will work, too.
FBX ABC Name
Checking this will make Change Strings search and (if it finds) replace the patterns in all the Object Names of the currently selected Alembic or FBX nodes. This is especially helpful because you cannot change the Object Names by hand without the use of scripting. Sometimes Fusion will struggle when changing the Object Identifier in the Alembic or FBX nodes and not properly load them. If this happens to you, simply save and reopen the composition.
Filepaths:
Loaders
Checking this will make Change Strings search and (if it finds) replace the patterns in all the Filename text inputs of the currently selected Loaders.
It will remember the previous Loader settings such as TrimIn or Hold last frame. Use the QuickSelect buttons to quickly select all Loaders. If you want to increase or decrease the version number of your Loader then check out the Versioning Tab.
Proxys
Checking this will make Change Strings search and (if it finds) replace the patterns in all the Proxy text inputs of the currently selected Loaders.
Savers
Checking this will make Change Strings search and (if it finds) replace the patterns in all the Filename text inputs of the currently selected Savers.
Use the QuickSelect buttons to quickly select all Savers. If you want to increase or decrease the version number of your Saver then check out the Versioning Tab.
FBX ABC Path
Checking this will make Change Strings search and (if it finds) replace the patterns in all the Filepaths inputs of the currently selected Alembic or FBX Nodes. This does include the FBX Exporter tool. So if you import an Alembic file into Fusion and want to export it as an FBX, using Change Strings on all the FBX/ABC tools will change the file path for the AlembicMesh3D tool and the FBXExporter.
QuickSelect

Change Strings runs on selected nodes. The QuickSelect Buttons make it easy to quickly select common tool types.
The QuickSelection feature makes this script a great alternative to the popular Change Paths script. Since you get all the benefits of Change Strings find and replace operation with the ease of quickly doing this on all Loaders/Savers/etc.
Loaders
This will select all Loaders in your composition.
Shift + Click to add Loaders to your current selection. Ctrl + Click to remove Loaders from your current selection.
L + S
This will select all Loaders and Savers in your composition.
Shift + Click to add Loaders and Savers to your current selection. Ctrl + Click to remove Loaders and Savers from your current selection.
Savers
This will select all Savers in your composition.
Shift + Click to add Savers to your current selection. Ctrl + Click to remove Savers from your current selection.
FBX ABC
This will select all Alembic and FBX tools in your composition. This includes the Alembic and FBX import tools as well as the FBX Export tool.
Shift + Click to add ABC/FBX tools to your current selection. Ctrl + Click to remove ABC/FBC tools from your current selection.
Search
This will select all nodes that contain the pattern you typed into the Search for field.
Shift + Click to add the search to your current selection. Ctrl + Click to remove the search from your current selection.
Previous
This will restore the selection you had before you clicked on one of the QuickSelect Buttons. This is only updated once as long as the same Change Strings Window is open. This means you can wildly click on the different Buttons but Change Strings will always remember the selection you had before using the QuickSelect feature.
As with the other QuickSelect Buttons, you can Shift + Click to add the previous selection to your current selection or Ctrl + Click to remove them.
Settings

Be Case Sensitive
Enabling this will force Change Strings to only replace patterns that have the same capital and lower letters as your Search for Inputs.
Disabling this means that Change Strings will ignore capital or lowercase letters in its search, but as mentioned before, it will not convert everything lowercase and the replacement will keep its correct upper case letters.
This is achieved by temporarily converting the string and the search lowercase, then searching for the location of where it is found, cutting out this pattern in the original string, and finally using this pattern to replace it with the desired new string. This is repeated until either the search string is not found again, or the Max Limit is reached. Usually, the Pattern Breaker and starting the search after the previous replacement will ensure that the Max Limit is not reached. (Learn about the Max Limit here)
Change Strings will change its behavior on the fly if it detects a situation in which the Case sensitive mode would be of benefit (or necessary). For example, when using Advanced Searches.
Space Splitter
This was the default behavior of Change Strings prior to version 2. When activated, instead of searching for one pattern, it will search for multiple patterns in one session. The different patterns are defined by spaces. This setting should be deactivated, for example, if your search contains spaces and should be treated as a single search.
General Search Behavior when Space Splitter is on
Let’s say we have this set of nodes in our flow and want to perform a very simple Search and Replace Operation.

First, we decide to get rid of the long names. We want to change all “Element” into a simple “E”. Change Strings will simply search for every tool that has “Element” in its name and change it to “E”.

Easy enough. This will result in this:

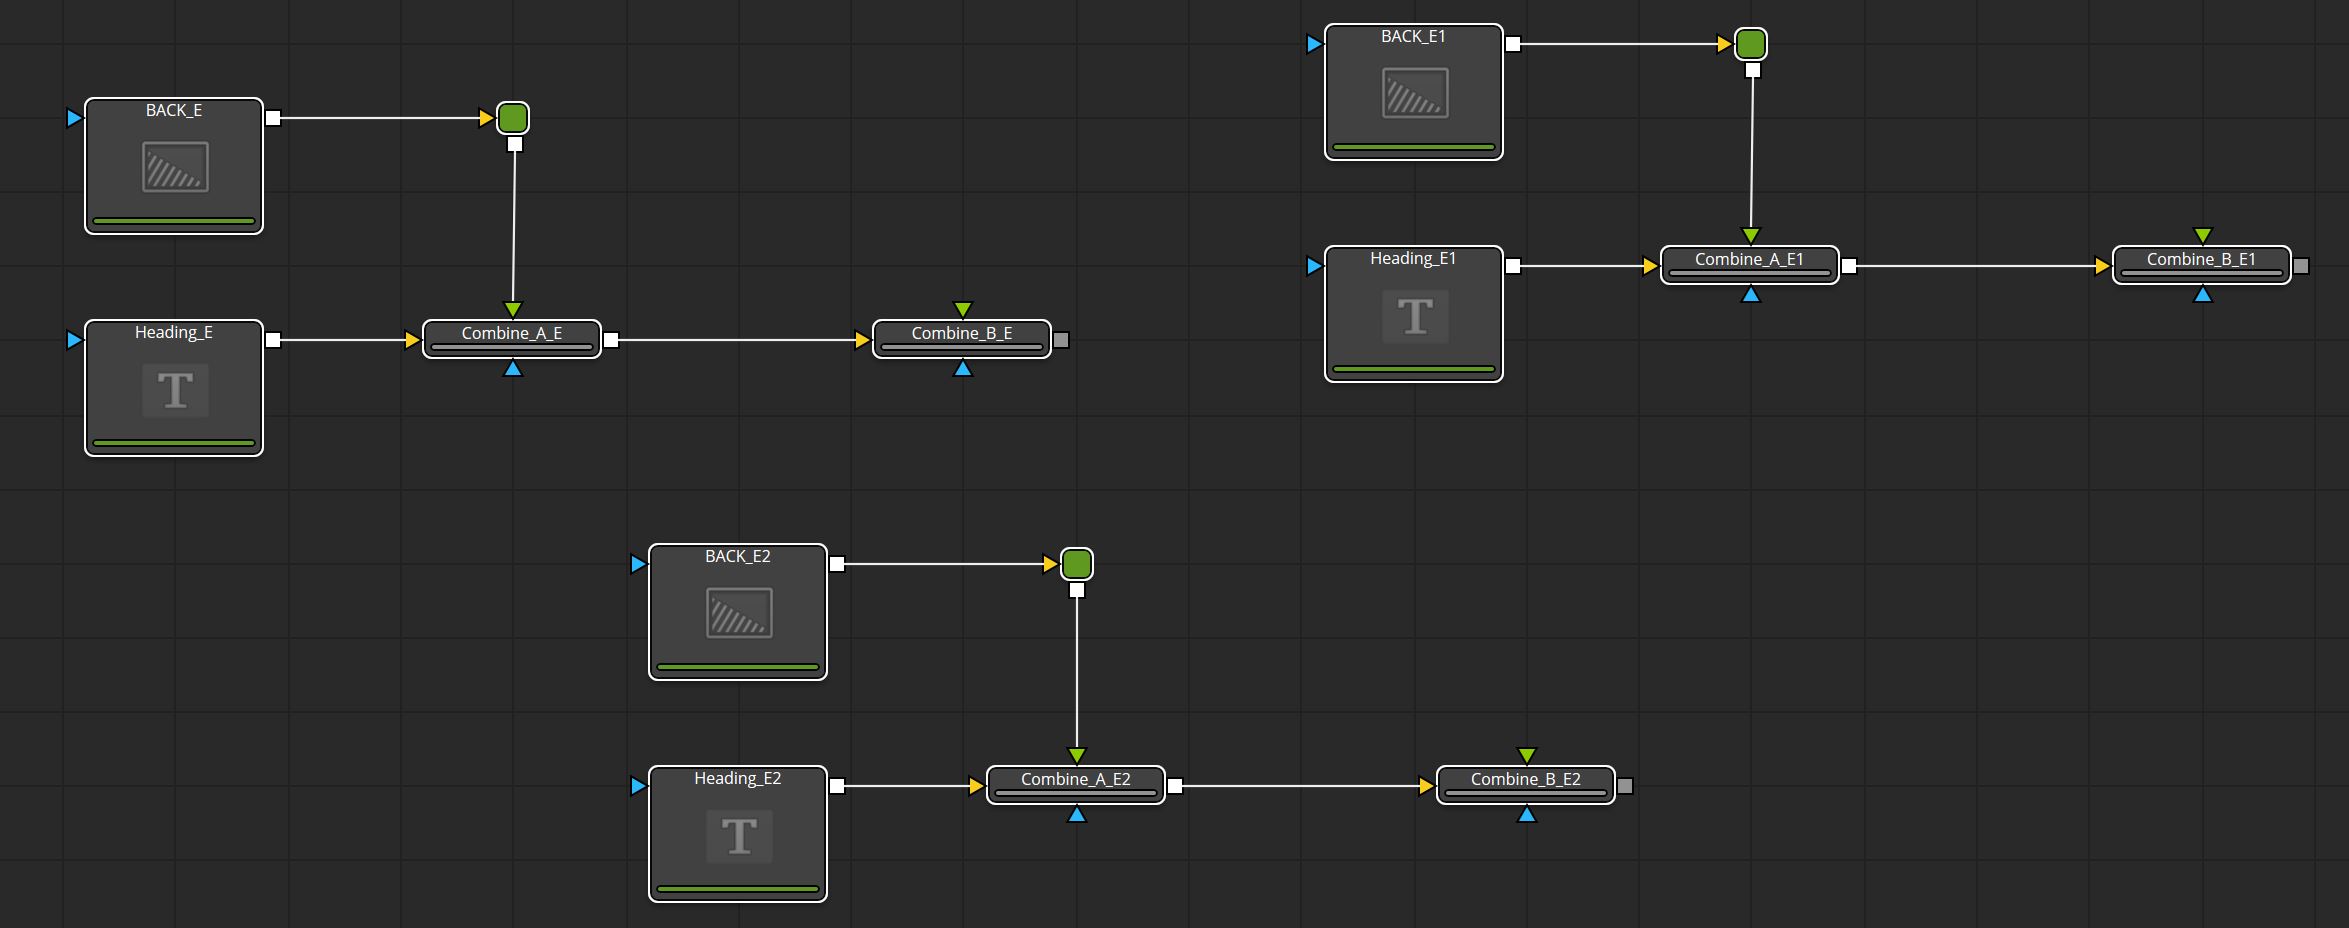
But let’s do a more interesting example. We want to change all “Merge” into “Combine” and the first Merge7 should be called “Combine_A” and the second “Combine_B”. For this, we will put this into Change Strings (I have colored the different Searches to more easily show the concept):

I have separated the different searches with empty spaces in between the different patterns. As you can see, Change Strings will use the first Search for Input and replace it with the first Replace with Input, then it will use the second input, and so forth. Notice that “7” and “7_1” are two completely different patterns for the Search and Replace operation which we can use to our advantage. But, we need to make sure, that it changes “7_1” before changing “7”. Otherwise, it would change “Merge7_1” to “Combine_A_1” before searching for “7_1”.
(Sounds more complicated than it is. If you’ve ever used a Search and Replace tool in another software, you will understand this.)
This results in these names:

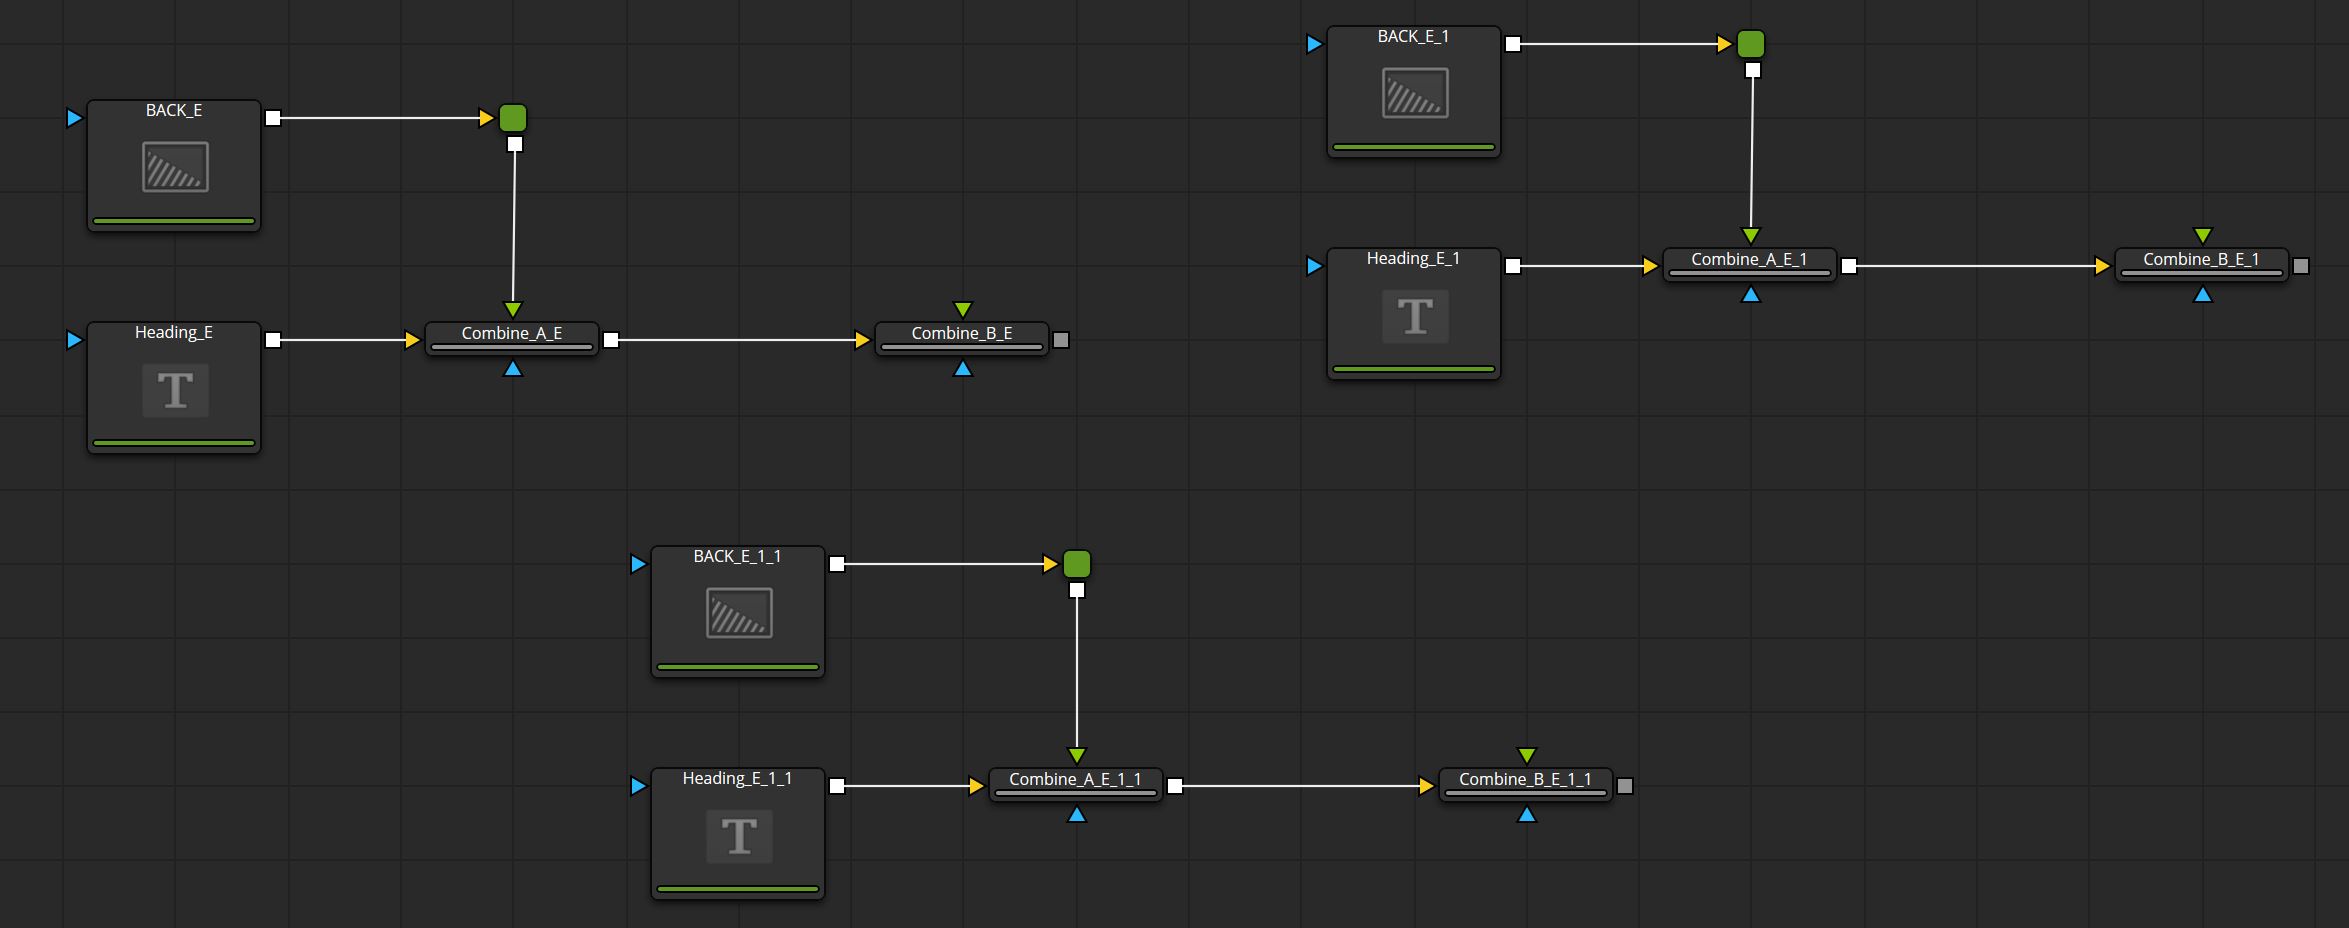
You may be wondering what happens if you search for more patterns than you want to replace. And yes, this is possible as well. Let us assume we want to change “Text” to “Heading” and we want both “Blue” and “Red” to be called “Background”. This is what we would need to put into Change Strings:

As you can see, if there are more Search for Inputs than Replace with Inputs available, Change Strings will simply use the last available Replace with Input. This would result in these node names:

It’s important to note, that Fusion can not have two nodes with the same name. This is why the second “Background_E_1” has gotten an additional “1”. This is the default Fusion renaming behavior. We could use Change Strings to replace “11” with “2” but in this case it would be easier to just rename it ourselves.
Also, if you put in more Replace with Inputs than there are Search for Inputs, then Change Strings will simply ignore the Inputs that don’t have a corresponding Search Input.
Include Modifiers
Attention: This is a Tristate Checkbox. Meaning it supports 3 states instead of the normal 2! These are unchecked, checked, and partially checked! In this case, it will transition from unchecked to checked to partially checked. This is simply for a consistent UI experience.
Enabling this will include connected Modifiers of the currently selected tools in the search and replace operation. Names and Expressions can be changed on Modifiers.
Clicking on it again will change the text and visual appearance of this checkbox to Only Modifiers and partially checked. This is to indicate that Change Strings will ignore the visibly selected tools and perform its search and replace operation only on the Modifiers of the currently selected tools.
I have chosen not to include other connected tools. For example, a Tracker tool could be connected to the Center input of a Transform tool. But it will not be included in the search as long as it is not properly selected. This is because I want to remove unnecessary confusion. Connecting the Center to a Tracker Modifier on the other hand would, of course, include it in the search.
Remember Inputs
Enabling this will save your current settings and inputs in Change Strings, but only if you let it run by pressing the (now properly named) OK and Save Button.
Change Strings in Fusion Standalone will, by default, save all the data locally into the current composition file. This means, if you have not yet saved your project, it will prompt you to do so. Also, you will keep your settings even if you open the composition on a different computer.
You can change this behavior to save the settings globally into the Fusion Preferences file. This means you will keep your Change Strings inputs even if you switch compositions. Of course, you can always switch back to locally saving. (Jump down to Advanced Settings)
Change Strings in DaVinci Resolve will always save its settings into the Fusion Preferences file. There is currently no way of changing this. (Why is explained here)
The Remember Inputs Checkbox will always remember its last state. This is because you might not want to overwrite or save your current search a few times in a row. I know I did, which is why this feature exists.

If you open your .comp or Fusion Settings file in a Text Editor, you will be able to see the Data that Change Strings has written. It’s located in:
Prefs = {
Comp = {
ChangeStrings = {}
Usually at the end of the file.
You can delete these settings manually if you don’t want anybody to know you’ve used my script. Just make sure you’ve not accidentally deleted or left too many “}” as this will corrupt your comp file until you’ve manually fixed this.
Stay open
As the name indicates, this will force Change Strings to stay open and await new commands.
OK and Cancel Button
OK
This should be self-explanatory. OK will run the script on all selected nodes. If you have Remember Inputs checked, then this button will change into OK and Save and run the script, and once it’s finished, it will save the Change Strings settings.
Cancel
This will simply close the window and not save any Inputs, even if Remember Inputs is selected. If you want to save them you can let the script run without having any nodes selected.
Versioning Tab

One of the most common questions about Fusion is, how to change several Loaders at once. And often we are talking about increasing version numbers. Change Strings was always capable of that, but you had to type something in the Search for and Replace with fields. It was quick, but it could be quicker.
The Versioning Tab is designed for exactly this: Quick version changes.
Clicking on one of the buttons will increase or decrease the version number on the selected Loaders, Savers, and FBX/ABC nodes. No need to type anything.
Note that it expects a “v” to prefix the version number AND consistent padding. For example “MyFile.v001.exr” would increase to “MyFile.v002.exr”. A wrong change could occur if your filename would be “MyFile.v10.exr” and you wanted to go down to “MyFile.v9.exr”. Change Strings would change this to “MyFile.v09.exr”.
Text Box Tab

The Text Box Tab is designed for replacing text that comes from outside of Fusion, or from Fusion inputs that aren’t supported. Like the Custom Tool text fields. Other than that it will work exactly like replacing in Names, Expressions, or Filepaths.
The Copy, Paste, and Move Buttons are designed for convenient usage and the Text Box. And mostly self-explanatory.
Paste Button
This will paste your current clipboard content into the Text In field. It will save the previous content of the text field and it can be recovered by Shift + Clicking on the Paste Button.
←Move Button
This will paste the content of the Text Out field into the Text In field. It will save the previous content of the text field and it can be recovered by Shift + Clicking on the Move Button.
Copy Button
This will copy the content of the Text Out field into your clipboard so you can easily paste it wherever it came from. It will save the previous content of your clipboard and it can be recovered by Shift + Clicking on the Copy Button.
About Window

The About Window features some (very necessary) self-promotion as well as a little help. But most importantly, this is where you can change the mysterious Advanced Settings you’ve heard about. This is the Pattern Breaker, Max Replace Limit, and since Change Strings 1.2, the Print Actions checkbox.
You see how reluctant I am to give you access to these settings, due to the additional Show Advanced Settings Checkbox you have to conquer beforehand.
Pattern Breaker
What is the Pattern Breaker?
The Pattern Breaker is a very important and integral part of this script. It ensures that Change Strings only runs as often as it has to and that you can replace several different versions of a pattern in the same string. For example, imagine you have a node that is called “Pear_APPLE_pear” and you want to change it to “PEAR_APPLE_PEAR”. You could enable Be Case Sensitive and Search for “Pear pear”. But that requires you to type in both variants of “Pear”.
If we were to disable Be Case Sensitive and only Search for “pear” then Change Strings would only find the first “Pear” over and over.
This is where the Pattern Breaker comes into play. Instead of replacing the first “Pear” with “PEAR”, it uses “PEïèëAR”. So now our node is called “PEïèëAR_APPLE_pear”. Change Strings will repeat this operation and now it will find the second “pear” and again replace it with “PEïèëAR”. After this, our node is called “PEïèëAR_APPLE_PEïèëAR”. It will repeat this operation again but realize that it can’t find any more variations of the pattern “Pear” and stop the loop.
Once it’s certain the pattern is nowhere to be found (or the Max Limit is reached) it will remove the Pattern Breaker to reveal the desired name/expression/filepath.
This also is the reason why Change Strings can switch patterns around without breaking a sweat (or falling into an endless loop).
There are of course fringe cases where the Pattern Breaker is not enough. For example. If your node is called “Pear_ar” and you want to replace “Pear” with “PEAR” and “ar” with “BB”. This would eventually lead to the name “PEBB_BB”. In this case, enabling Be Case Sensitive would give you the desired result, but I hope you understand what happened if you run into this issue.
Changing the Pattern Breaker
The default Pattern Breaker is “ïèëï”. Which I chose because it’s very difficult to type on most keyboards and, as far as I know, not a word. But if you really need to change it, then I want to give you the ability to do so.
You can type any string into the designated field and hit the OK Button.
Max Replace Limit
What is the Max Replace Limit?
It stands for Maximum Replace Limit in case you didn’t notice. Whenever you run Change Strings, it will repeat the search until it can’t find the string anymore. This can (in fringe cases) lead to endless loops. That’s why there is an upper limit to how often it can try to replace a pattern.
But the Max Replace Limit does not play a big role anymore since version 2 of Change Strings. It still helps to prevent almost endless loops but the limit on how often Change Strings will check again for a pattern is now dynamically set by the length of the input string.
Changing Max Replace Limit
If for some reason, you find that Change Strings wasn’t able to complete its job due to reaching the Max Replace Limit, then you can increase the value in the designated field. You will see an error either in the Console or the Notification label.
Just run the script again if you encounter an issue.
Force Resolve Global Mode
This setting has been deprecated and is no longer visible since version 2. It will always save the settings in the Fusion preferences file. To compensate for this, Change Strings will remember up to 5 previous Search for and Replace with inputs.
Print Actions
This is disabled by default and means that most actions of Chang Strings will be visible in the console.
Disabling this will reduce the number of console messages drastically without changing any functionality. Please enable this if Change Strings did not work as intended.
This should explain everything, but of course, If you have any questions or requests, drop a comment down below!
On the next page is the Download link, Changelog and some more background information


