Page Contents
Page 1
Foreword
Hi, I’m Noah and today we will be creating animations like this 100% inside of Fusion. While this tutorial is quite long, all individual parts of this animation are very simple and easy to understand. On our way to rendering, we will be learning how to create a simple procedural 2D Animation, create an image particle Emitter, create interactive 3D Volumetric God Rays and composite all of that together. Here and there we will utilize some simple expressions, and I will show you some handy shortcuts along the way. After this tutorial, you will feel much more confident in creating Motion Graphics in Fusion and working in Fusion in general.
While I am using Fusion Standalone, everything I am doing is possible inside DaVinci Resolve including the Free Version. If you struggle with something, you can download the Scene file for free. But please consider supporting me if you have the means:
DownloadI will try to explain everything we’re doing while keeping this somewhat short.
Let’s get started.
Creating the Base
Ellipse Node

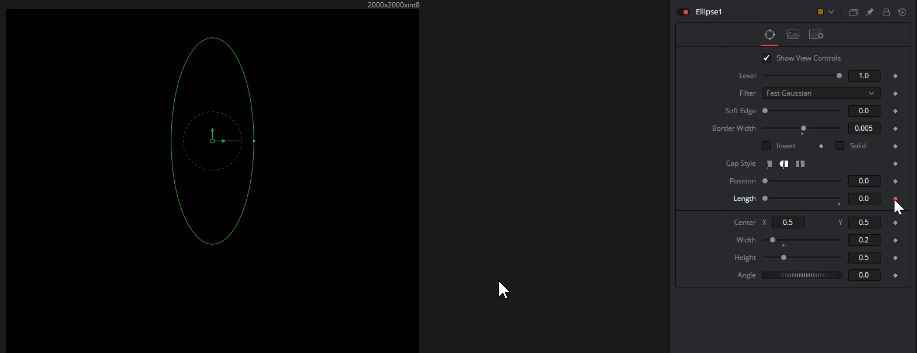
Let’s start by adding an Ellipse Mask. Press Ctrl+Spacebar, or whatever your add Tool shortcut is. Press the 1 or 2 key to view this in your preferred viewer. This will be the base of our animation. We want an outline, not a solid, so uncheck Solid in the inspector. Increase the Border Width to see the outline. I will choose 0.005. Let’s make it easier for us to see our line by viewing this in the second viewer and disabling the green controls outline. Click in the second viewer and press Ctrl+K. (In the video at 01:45)
Let’s grab the green control line in our other viewer and decrease the Width of our circle. Mine is 0.2. Next, we want to increase our resolution and change our aspect ratio from 16:9 to a square. For this, we will head to the Image Tab and change the output size to Custom. I will choose 2000 by 2000 pixels. But, like everything else don’t shy away from using your own values. (02:15)
Next, we will add a Transform node. Fusion will automatically connect our Ellipse Mask node to the blue mask input of our Transform. But we want this to be an image, so pipe the ellipse into the yellow background input.
Everything we will do on this Transform Node is to move our Ellipse slightly up, so for organization reasons let’s rename this by hitting F2. I will call this TransUp. Grab the handle and move our Ellipse up. (02:30)
Animating the Ellipse
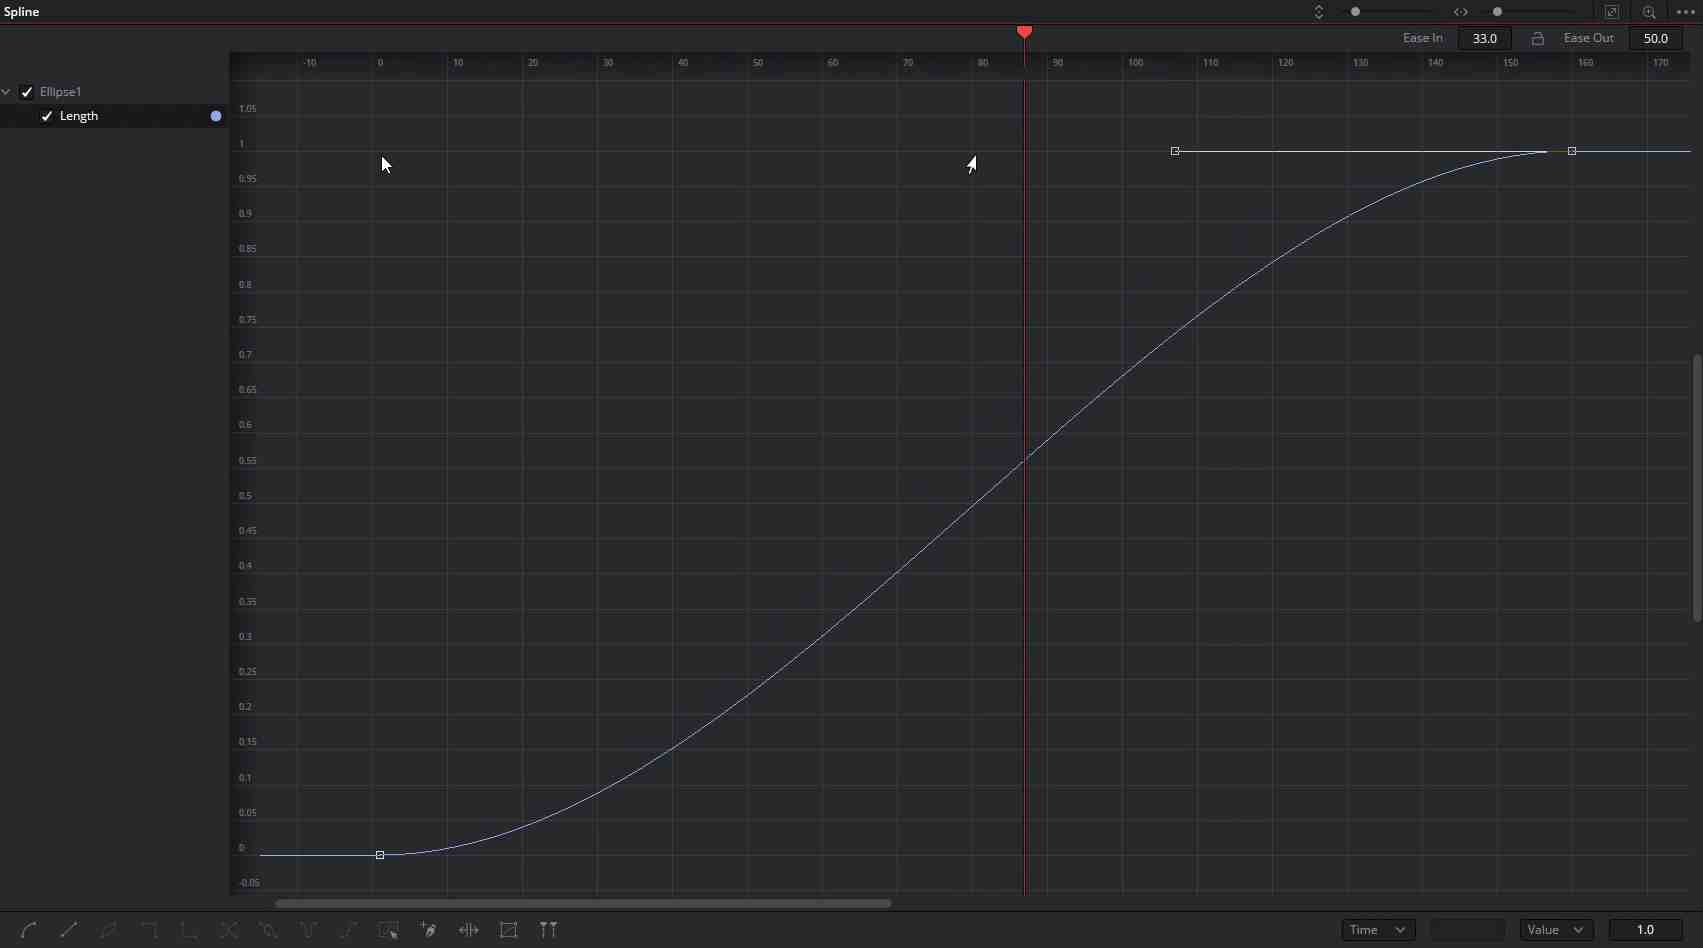
Now we will use a new feature from Fusion 16.2. Animatable length of splines. Go to the first tab in the inspector called Controls. If we move the slider of the Length parameter we see what this does. Got to your first frame, yours will probably be 0, I changed my default first frame to 1. Set the length to 0 and set a keyframe by hitting the little keyframe button next to our Length parameter. I will go to Frame 160 and drag the slider to 1. (03:20)
If you’re working in Fusion Standalone like I am, you might want to change your Composition Length. We won’t need 1000 frames for this project and it will be easier to navigate if we decrease the “Global End Time”. I set mine to 400.
Let’s make our animation slightly more fancy. We want to remap the animation to ease in and out. Open the Spline Editor on the upper right side. Click on Length to see our Animation Path. Now we will use a series of shortcuts. First, we use Ctrl+F to focus the view on our active Animation Path. Then, Ctrl+A to select all keyframes and finally Shift+S to smooth our Spline. We can control the ease in and ease out with the handles on our keyframes. The default values are still too tame. Hit T to open a little window where we can more easily change our ease handles without messing with their tangents. We will crank both numbers up until we’re happy. (04:18)
Duplicate Node
Copying
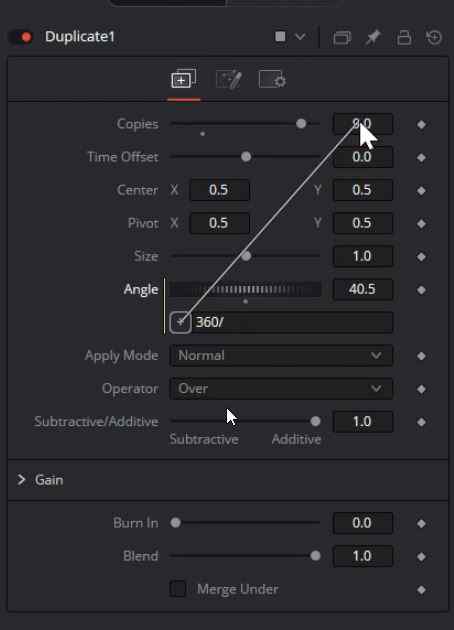
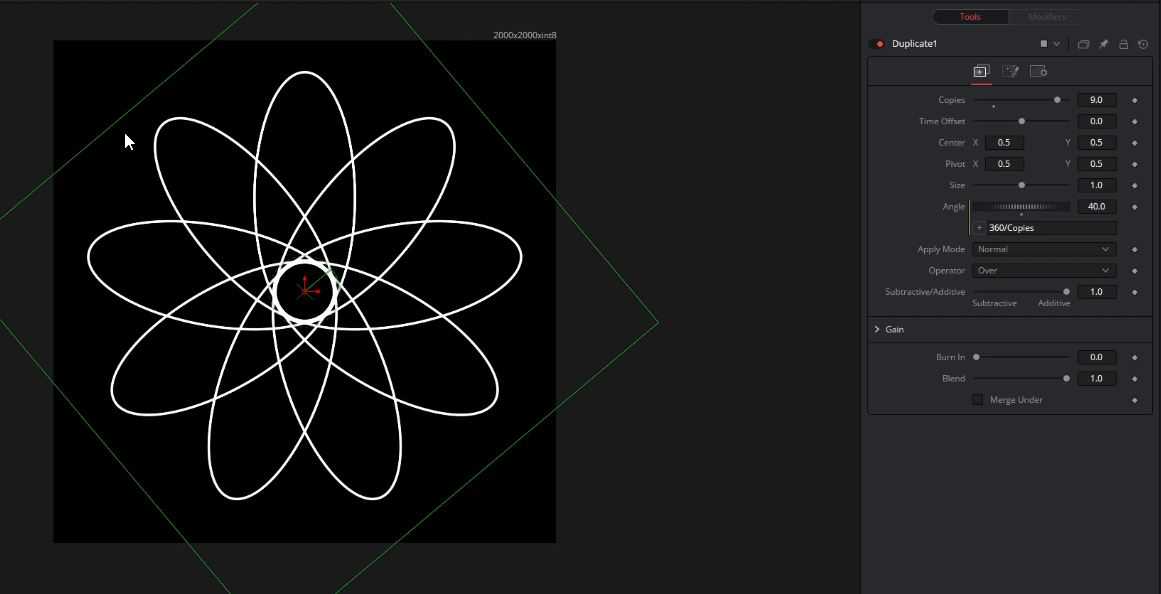
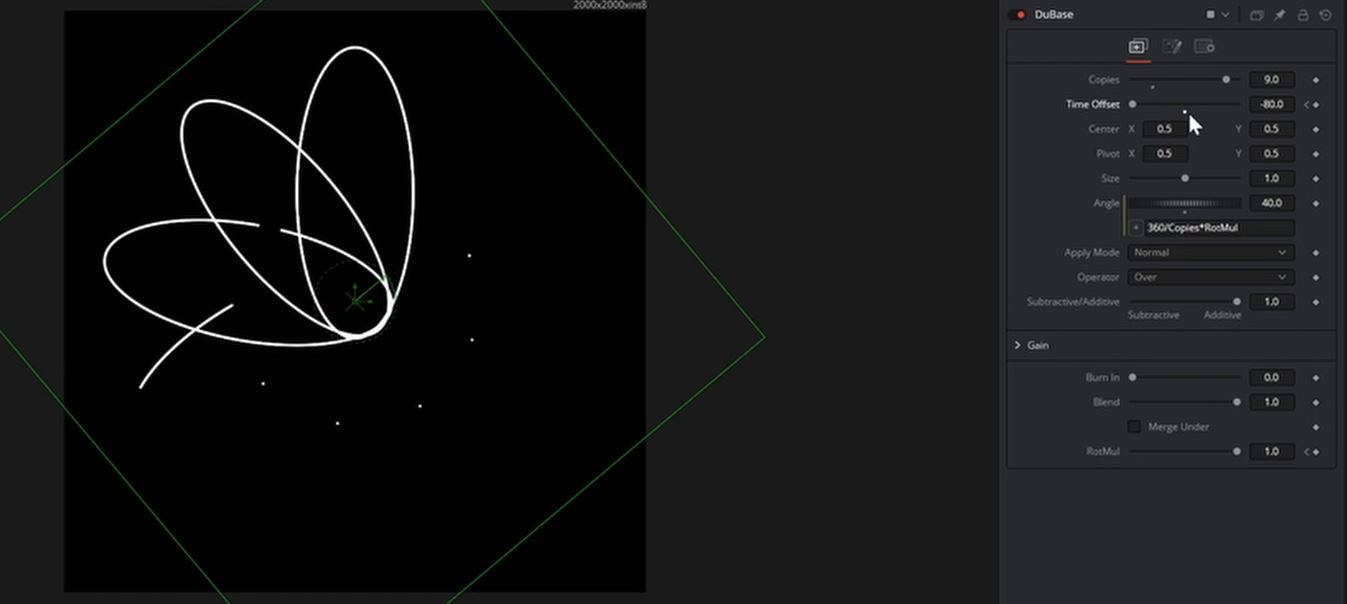
But this is still only a single Spline and we want this to open up. Let’s duplicate this animation by adding in a Duplicate Node. By default, we won’t see any change. This is because we are creating a duplicate of our image and the exact same position in space and time. We could increase the Angle and see our copy. We will increase the number of copies. Theoretically, we could animate the Angle to get our rotating animation. But this would limit us if we ever want to change the number of copies. An Expression will help us with that problem. Right-click on Angle and choose Expression. We type in “360/” and use this handy little whip (+button) next to our Expression and drag and drop it to our Copies Parameter. Now, no matter how many copies we have, this will always have the right angle. (06:05)
Creating a Custom Slider
If we look at our animation right now, we see that all of our copies are animating at the same time and we still have no rotation. We will deal with the rotation first. We won’t be able to animate our Angle since it’s already connected to an Expression. That’s why we will create our own animateable slider. (If the following explanation is unclear, head to this QuickTip for more images and a video)
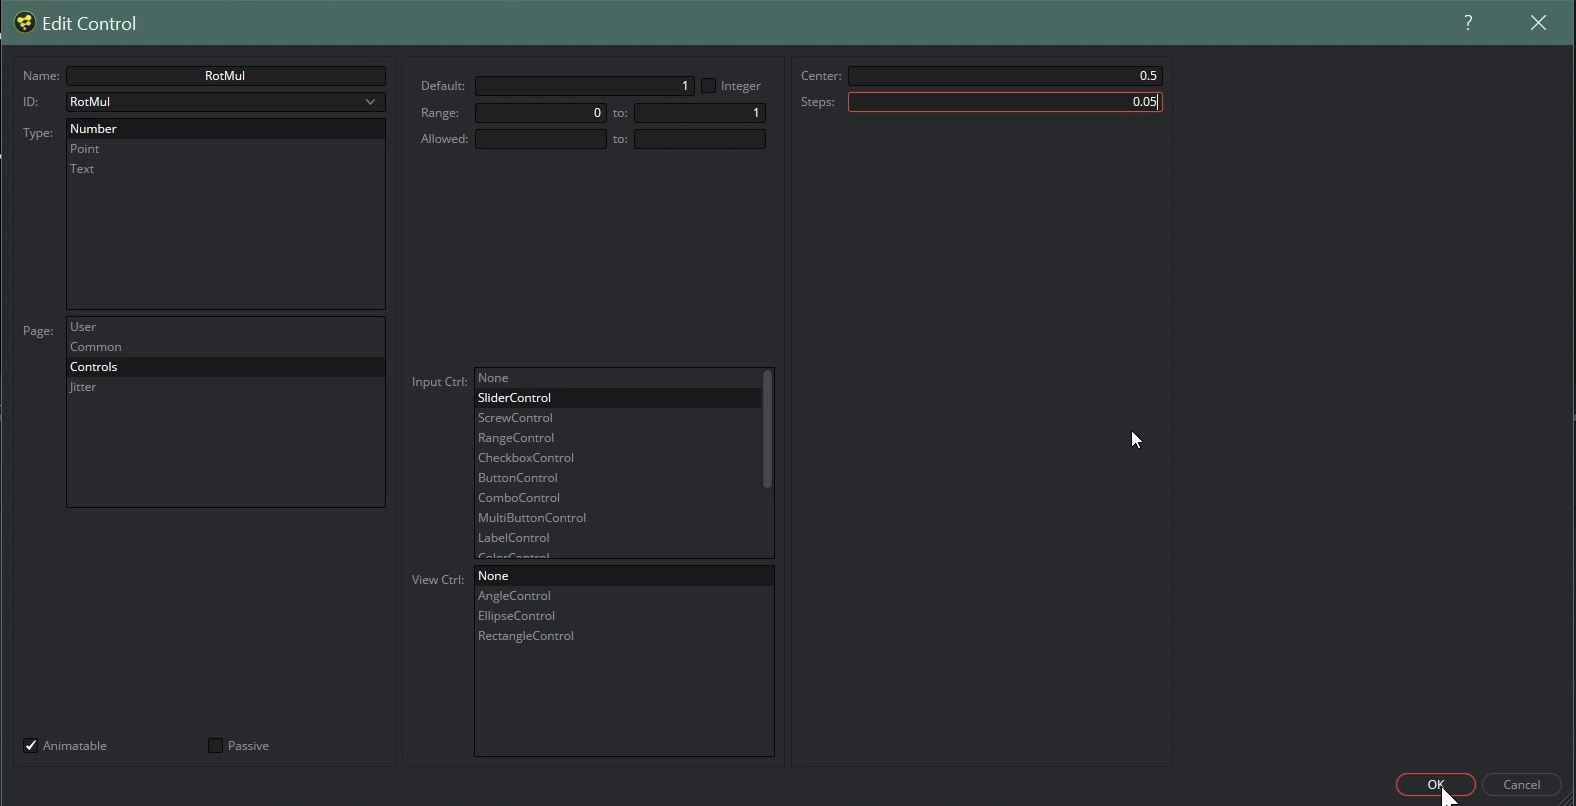
Right-click on the Duplicate node and hit Edit Controls.
We want to create a Rotation Multiplier, so I’m going to call it RotMul. We want this to appear on our Controls Tab. The Default should be 1 with a Range from 0 to 1. The Input Ctrl should be a SliderControl and we want our Center to be at 0.5. I also change the steps to 0.05. Press Okay and there we have our Slider that doesn’t do anything right now. (07:05)
We will go back to our initial Expression and multiply it by our new Slider RotMul. The Expression should read “360/Copies*RotMul” And here we have our animatable Expression. So let’s go back to our first frame, set our slider to 0 and set a keyframe, go further in the timeline and set the slider to 1. It’s rotating but they still appear at the same time. Before we fix that we can rename our nodes. This is the base of our animation so I will call the Duplicate Node DuBase and the Ellipse Base. (08:30)
Now, we could also smooth the Rotation animation, like we did before in the Spline Editor.
Time Offset the Animation
To offset the animation we will change the Time Offset on our DuBase. Since I have already done this, I know what numbers I like. I go to frame 110 and type in -80 and set a keyframe. Then, I go further to frame 295 and set the “Time Offset” to its default value 0 by pressing the little dot below the slider. (09:00)
Speaking of dots. We can already see our Splines as little dots before their animation starts. To fix this, we will change this by heading to our Ellipse which now is called Base. We will animate the Border Width from 0 to 0.005 in the first few frames. (09:50)
Looking at our animation, we can see that our Playback speed is quite low. To fix that we will activate the Proxy Mode by clicking on the Prx Button below our viewer. This will only scale down the image resolution while working on it. The final render will not be affected. (10:20)
Adding Color
Now that we have realtime playback and our animation, we should add some color. Create a new Background Node. By default, it will be the resolution of your Project Settings so we will change this to the resolution of our Base Animation. We go to the Image Tab and change this to 2000 by 2000. In my case, the Depth is already set to 32Bit. You won’t need 32Bit right now but I would advise using at least 16Bit Float for this.
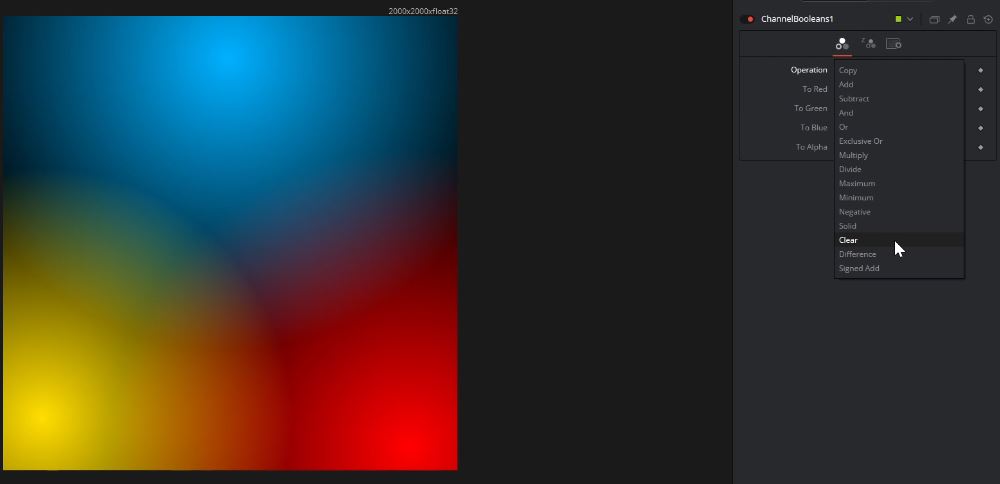
In the Color Tab, we will change this Background to a Gradient that is Radial. You can use whatever colors you like, I will choose a nice blue, as the second color black and position it to the top. I will copy and paste this until I have three Background nodes with different colors. In my case Blue, yellow and red (Some inspiration came from the Resolve Logo)
Now, we will combine these three by grabbing the wire of our yellow Background node and drag and drop it over the Output of our blue Background Node. Fusion will automatically create a Merge node and combine our backgrounds. We want to do an Add Operation by dragging the Alpha Gain Slider to 0. We repeat the same with the third Background. (10:20)
How do we get this color to our animation? We want to clear the pixels from our Background except where our animation is happening. We do that by taking a Channel Boolean Node and setting its Operation to Clear. Right now it will clear away everything so we take our animation and pipe that into the blue mask input of the Channel Boolean. We need to invert this. There are several ways to do that but I chose to use another Channel Boolean with the Operation set to Negative. I’ll quickly rename these two to CB_Clear and CB_Negative. (12:30)
Bring this to 3D
Next, we want to bring this into 3D by adding in an ImagePlane3D. As you can see, we are in the 3D Workspace of Fusion now. To combine this with a moving Camera will be adding a Merge3D and a Camera3D to this Merge. Since I have already done this, I know that I will be having issues with the image plane clipping so I will go to my Camera and change the Near Clipping to the lowest possible. (13:53)

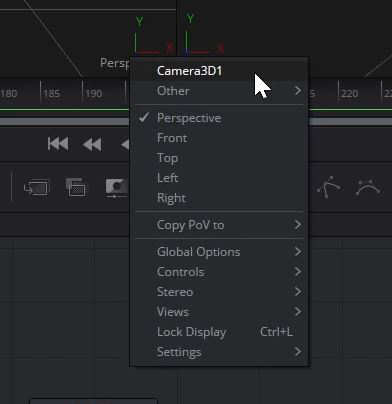
We want to look through the Camera while animating it, so in one of our viewers, we will right-click on the Perspective Text and select our Camera3D. Let’s drag the camera out a little bit and change the Focal Length, I chose 21 but as everything else, this is up to you. (14:27)
We will go to the Transform Tab and select Use Target. This target will control the rotation of our Camera and will make it easier for us to animate. We will right-click on the Translation Text and select Animate Translate Group to activate keyframing on all three parameters. We will do the same for the target. Now we can simply animate our camera as we like. You should do that now.
The movement will probably look very janky so we will smooth this, again, just like before in the Spline Editor. Make sure all Camera Parameters are selected and hit our favorite key combos Ctrl+F, Ctrl+A, and Shift+S. I will select my last keyframes and increase the Ease In. This looks better but I want an even steeper curve, so I select the second to last keyframes and increase the Easy Out value as well. Now we have a shorter but stronger acceleration. This is starting to look good. (14:50)
Bring this back to 2D
But now we need to render our 3D animation to get a 2D image, just as we would in a 3D Application, like Houdini or Blender. For this, we will use the Render3D node. I will rename this to R3D_Base. (15:54)
There we have our rendered 3D Animation. The checkered background, indicating transparency, is irritating me and since I know that I will render the final animation on a dark background I will click on the three dots on the upper right side of the viewer and uncheck Checker Underlay. (16:15)


